Email is our lifeline to the online world and for a small business, it is crucial to know right away what is going on when one of our customers, vendors, or employees sends us an email. However, since most small businesses also maintain a plethora of online accounts, subscribe to important newsletters, and put their name out there, it’s inevitable that their inbox can become a cluttered mess. Important emails may be lost in the shuffle and junk mail and spam may soon overwhelm your organized way of life.
Thankfully, with a few simple adjustments, you can get this problem under control. Most email programs give us some excellent tools to help us control the confusion of the modern inbox.
Creating Folders
You wouldn’t keep all your companies documents in a big cardboard box, would you? Obviously, this is not the best way to find what you need quickly. A file cabinet is a much better solution. But since most inboxes sort by date, you are essentially looking at a big pile of papers. Creating folders is the first step towards getting organized. If you have common emails you only need to see now and then – for example, newsletters – create a folder for them. This will take the cut down on the clutter. If you receive emails you always want to keep, move these to a special folder as well so they won’t get accidently deleted as you erase older emails. But what if your box is already filled with a thousand emails? That brings us to our next step, creating email rules.
Email Rules
Now that you have folders, it’d be great not to have to manually move everything to them as it arrives. Email rules can be setup in a matter of minutes to automatically route incoming mail into the correct folders when it arrives. Rules usually allow you to enter a specific sender, subject line, or other attribute as criteria for moving incoming mail to the correct folder. Most email clients will automatically sort through your existing messages and put them into folders when you apply a new rule. You can also make rules to send spam and junk mail straight to your trash folder by listing out common words that you know only come along in spam email messages.
Search Folders
Since small business owners often use their email as their main resource for tracking progress on a project, additional organization might be needed to group data in a different way. Maybe your new folders and rules work great for some cases, but you find that you also need to sort some data in another way. For example, you have folders for art resources, accounting emails, and customer requests, but you also have a project that uses all three of these. You can create a “virtual” folder that lets you view all the data on your project in a single place, regardless of where the actual messages are stored. Creating a search folder is much like creating an email rule, except the emails appear in their “real” folders as well as the “virtual” ones.
In a small business, we often have to wear many hats. By using these techniques, you can make sure you don’t let an important email go unnoticed. Get back to your customers and vendors as quickly as possible by turning your chaotic inbox into a well-organized emailing machine.

I.T. Tips from fergus.it
2.12.10
Share files that are too big to e-mail
Ge.tt is a clever, instant file-sharing webapp that makes sharing large files simple and fast. You can share a link to your file(s) immediately, without waiting for the upload to complete, and it doesn't use Flash, Java applets, or any other plug-ins.
Ge.tt couldn't be easier to use. You don't even need an account to use it. Visit www.ge.tt, click the Select files button, choose one or more files you want to share (or you can simply drag and drop in supported browsers), and that's it. Ge.tt will begin uploading your files and instantly generate a unique URL for you to share.
You can share the link before the upload is finished—files will update on the download page in real-time, as they're uploaded, and the user on the other end can start downloading a file while you're still uploading it. In fact, you can also add files to the share after you've shared the link. Any new files you upload will automatically show up on their end without reloading the page.
www.ge.tt
16.11.10
How to Fix a Corrupted Recycle Bin in Windows 7 and Windows Vista
1. Open an elevated Command Prompt window. To open an elevated Command Prompt, click Start, click All Programs, click Accessories, right-click Command Prompt, and then click Run as administrator.
2. Type the following command and press ENTER:
rd /s /q C:\$Recycle.bin
(This clears out the $Recycle.bin folder for the C:\ drive. You may have to do this for each hard disk partition in your system.)
3. Type exit to close the Command Prompt window.
2. Type the following command and press ENTER:
rd /s /q C:\$Recycle.bin
(This clears out the $Recycle.bin folder for the C:\ drive. You may have to do this for each hard disk partition in your system.)
3. Type exit to close the Command Prompt window.
26.10.10
How to View Email Headers in Outlook 2010
Tracking down where an email came from can be useful at times. This can be done by viewing the email headers.
To see them in Outlook 2010, open the email you wish to view the headers for. Then click the File menu.

Click the Properties button in the menu

A new window will open and it will show you the headers

To see them in Outlook 2010, open the email you wish to view the headers for. Then click the File menu.
Click the Properties button in the menu
A new window will open and it will show you the headers
14.10.10
Windows 7: Easy steps to a faster network
To start, if you're in a homegroup, exit it*. Once every PC has left the homegroup, it no longer exists.
Next, to disable HomeGroup and change encryption levels, open the Control Panel, select Network and Internet, then Network and Sharing Center. Once there, in the left-hand pane choose Change advanced sharing settings.
In the Home or Work section of the dialog box, scroll down to File Sharing Connections and click the radio button for Enable file sharing for devices that use 40- or 56-bit encryption. (Note: You need this setting anyway, if you want to share files between Win7 and an XP box. More on this to come.)

Next, a bit further down under HomeGroup connections, select Use user accounts and passwords to connect to other computers.
Save the changes, and you're done!
* To leave a home group: Open HomeGroup by clicking the Start button , clicking Control Panel, typing homegroup in the search box, and then clicking HomeGroup. Click Leave the homegroup, and then click Finish.
Next, to disable HomeGroup and change encryption levels, open the Control Panel, select Network and Internet, then Network and Sharing Center. Once there, in the left-hand pane choose Change advanced sharing settings.
In the Home or Work section of the dialog box, scroll down to File Sharing Connections and click the radio button for Enable file sharing for devices that use 40- or 56-bit encryption. (Note: You need this setting anyway, if you want to share files between Win7 and an XP box. More on this to come.)
Save the changes, and you're done!
* To leave a home group: Open HomeGroup by clicking the Start button , clicking Control Panel, typing homegroup in the search box, and then clicking HomeGroup. Click Leave the homegroup, and then click Finish.
11.10.10
NoReplyAll: An Outlook Plugin To Disable the Reply All & Forward Buttons
Many times we happen to get unwanted emails which are actually meant for a concerned person, but end up being in our Inboxes because the sender has hit the ‘Reply All’ button. You can avoid this scenario, at least in both Outlook 2010 and 2007.
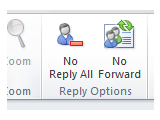 A free add-in for Outlook called NoReplyAll disables the ‘Reply All’ and ‘Forward’ buttons in emails sent by you. You will see two newly added buttons, ‘No Reply All’ and ‘No Forward’ to your Outlook ribbon when composing a new e-mail.
So the next time you send a mass email, just click these buttons, and you and every one else is safe!
Download NoReplyAll Add-in
So the next time you send a mass email, just click these buttons, and you and every one else is safe!
Download NoReplyAll Add-in
New Facebook Worm Posts Updates Automatically Infecting Friends
Here is a story from a victim of a new Facebook worm:
'I just got an update on Facebook from a friend asking what I was doing in a video they saw. I clicked on the link and discovered I needed to login again to Facebook again… Huh, that’s odd I thought as I typed my username and password again. And just as I was pressing the enter key, that voice in my head went off and I realized I didn’t check the URL on the link. Sure enough, the site I just logged into was NOT Facebook.com even though it looked just like Facebook. Crisis mode…
I quickly jumped back into my REAL Facebook account and checked who else received my friends “message”. Sure enough, the same message was being posted to every one of her friends obviously through an automated worm which I probably just picked up. I just fell victim to a classic Phishing attack.'
To avoid this happening to you DO NOT follow this link, if you see this message or anything close to it, simply delete the post so no one else will click it either. Next you should email the person who you got this from to let them know their account was compromised. It’s important to let them know because they’ll need to get rid of the culprit.
If you do get infected do this:
Step 1 - Login to your Facebook account and go to Account | Application Settings
Step 2 – Confirm you have the following two applications:
coma estas
Veoh Videos
Step 3 – Go to the little x on the right side and delete both the applications.
Once you delete those two applications your auto updates/posts should stop right away. I also highly recommend you change your password immediatly since they collected it earlier.
These types of things will most likely get worse in the future so we need to always be aware of what we’re agreeing to or signing up for when allowing applications to access our Facebook account.
9.10.10
Disable Threaded Conversation View In Gmail
Gmail groups all replies with their original message, creating a single conversation or thread, popularly known as Conversation View. Now any user who wants e-mail messages viewable in the traditional way, i.e, all messages and replies split and listed by date sequentially in the mailbox can disable and turn off the conversation view.
Login to your Gmail account.
Click on Settings (find it on the top right corner of the screen).
In the General tab, find the Conversation View section.
Click on the radio button of Conversation view off.
Click on Save Changes button.
Login to your Gmail account.
Click on Settings (find it on the top right corner of the screen).
In the General tab, find the Conversation View section.
Click on the radio button of Conversation view off.
Click on Save Changes button.
8.10.10
The Shortened Guide to Goo.gl
Google has opened up its goo.gl URL shortener for everyone to use.
In short ;-) it takes really long URLs:
http://www.marketingpilgrim.com/2010/09/courts-disagree-on-expectation -of-privacy-regarding-social-media.html
and shortens them
goo.gl/UZhO
which makes sharing long links by e-mail easier!
In short ;-) it takes really long URLs:
http://www.marketingpilgrim.com/2010/09/courts-disagree-on-expectation -of-privacy-regarding-social-media.html
and shortens them
goo.gl/UZhO
which makes sharing long links by e-mail easier!
5.10.10
Microsoft Word Recovering from a Crash
Manually saving the file (the popular Control-S shortcut on Windows) is one way to retain more of your work. Although it does not replace manually saving the file at frequent intervals, recent versions of Microsoft Word include an AutoRecover function that can sometimes salvage a more recent version of a file after a crash.
To use the AutoRecover in Word 2010, go to the File menu and choose Options. On the left toolbar, click on Save. Make sure the checkbox is turned on next to “Save AutoRecover info every:” and then type the number of minutes between automatic saves of the file. The default is usually 10 minutes, but you can choose more frequent autosaves.
In Word 2007, you can get to the equivalent Save settings by clicking the Office Menu button, clicking on Word Options and clicking on Save in the left toolbar. In Word 2003, go to the Tools menu and choose Options.
The Word Options/Settings box also lets you turn on a checkbox to save a backup copy of your file on the computer; found under Advanced options.
After a system crash, Word’s AutoRecover function should kick in and show you the version of the file it saved on its own, which is hopefully newer than the last version you manually saved.
28.9.10
Mapped Network Drives Disconnecting
In Windows 7 and Vista mapped network drives will disconnect themselves after a time and show a red cross on the drive icon. You will still be able to click on the drive and see/use the contents but applications that require a network drive will see them as disconnected and will not see files.If you try to disconnect the drive it will still sit there saying 'Disconnected Network Drive' - the only solution is to reboot.
This is because there is a default disconnect time for inactive network connections. To correct this and turn the autodisconnect off do the following:
Open the command prompt (as an Administrator)
In the Command box type:
net config server /autodisconnect:-1
and press return.
Reboot computer.
Your mapped network drives should now stay connected - this is a permanent fix.
Also - when connecting mapped drives to Vista or Windows 7 - connect them with the full domain name of the server i.e. \\servername.domain.local\sharename NOT \\servername\sharename - Vista/Windows 7 insist on full domain paths in order to reconnect. You can connect using just servername but if it needs to reconnect it will not find the server.
If the above fix doesn't work then try this:
1.Click Start , type regedit in the Start Search box, and then press ENTER.
2.Locate and then right-click the following registry subkey:
HKEY_LOCAL_MACHINE\SOFTWARE\Microsoft\Windows\CurrentVersion\Policies\System
3.Point to New , and then click DWORD Value .
4.Type EnableLinkedConnections , and then press ENTER.
5.Right-click EnableLinkedConnections , and then click Modify .
6.In the Value data box, type 1 , and then click OK .
7.Exit Registry Editor, and then restart the computer.
WARNING - editing the registry incorrectly can cause your computer not to work properly or even not start at all - only try this fix if you are confident using regedit.
15.9.10
New Email Worm (since August 2010)
The e-mail's subject is ‘Here You Are’.
It appears to be a link to a PDF, but in reality, is an executable file.
Once infected, the worm then sends itself on via contacts found in your email contact lists, and has keylogging software and backdoor access built-in.
Please delete even if it is from someone you know.
9.9.10
Powerline Network Adapters
Powerline Network Adapters use your home’s existing electrical wiring to create a network and can supplement or replace a wireless network.
Every power outlet becomes a potential network port for easily connecting computers, digital media devices, game consoles, print servers and network storage devices throughout your home or office.
They are capable of delivering data transfer rates of up to 200Mbps. This fast transmission speed is suitable for transferring or backing up large amounts of data, HD video streaming, VoIP calls, and online gaming.
Starter kit's start at around £60 for example: http://tinyurl.com/347u36p or http://tinyurl.com/38aopbt
8.9.10
Free Encryption software for your USB Flash Drive
FreeOTFE is freeware file encryption software, it lets you create so called voumes/disks which operate exactly like a normal disk, with the exception that anything written to one of them is encrypted before being stored on your computer’s hard drive. No one except you can open and view those files. In order for someone to read the files on those encrypted volumes in the future the person will need to use FreeOTFE and know the password.
You can download from: http://www.freeotfe.org/download.html
Creating a new encrypted volume is very simple.
Select New and then click on Next.
For beginners it’s recommended to go with disk image file stored on your filesystem option.
In the next steps you will be asked to select a size and a password for your volume file along with some other options that you can leave on default settings.
Finally, check everything and click on the Finish button to complete the wizard. At this point you will get your encrypted volume where you can add the files. The volume file has .vol extension and stored in the location indicated durng the volume setup wizard.
When you have created your first volume, FreeOTFE will automatically mount it as a disk on your PC, and you’ll be able to copy and remove files just like another hard drive. You should find it under ‘My Computer’.
Please note that you need to format it (via right-click menu) before you can open it and move the files there for the first time.
Once the volume is formatted you can start moving the files there. When you’re done, open the FreeOTFE and select the ‘Dismount’ option to hide the disk/volume. This will remove the volume from ‘My Computer’.
After you finished working with the files and dismounted the volume, you can copy that newly created volume file to any media, a CD, a USB stick, or a memory card and carry it with you wherever you go.
Whenever you want to access or edit files on the encrypted volume you will need FreeOTFE (or similar encryption program) and a password that you provided during the volume setup wizard. First open the FreeOTFE, then click on Mount, select the encrypted volume (.vol file) and enter the password. This will mount the file as a drive and add it to ‘My Computer’ window. (Note: Make sure to dismount the volume when you are done working with it)
You can also copy a portable version of FreeOTFE (from Tools> Copy FreeOTFE to USB drive) to access the files from a computer which doesn’t have FreeOTFE or another decryption program.
At the moment, the safest encryption mode is XTS, and I recommend you use it instead of the others if you have very sensitive data.
6.9.10
How to Disable “This device can perform faster” Message in Windows 7
Sometimes when you insert your USB drives into Windows 7, you might have seen this message “This device can perform faster”. This message is a result of two USB communication speeds, known as USB 1.1 and USB 2.0. USB 2.0 has high speed when compared to 1.1 version. In case you are tired of seeing this message every time you insert your USB drives, you can easily disable them using the Windows device manager.
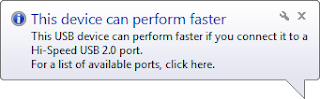
In case you see this message when using USB drives, click on the balloon message and this will open the Device can perform faster window.

At the bottom of this window, you can see an option “Tell me if my device can perform faster”. Uncheck the option can close the window. Now on, you will not see the balloon message when you insert the USB drives in Windows 7.
2.9.10
Private Browsing
All of today's popular browsers include a private browsing feature.
These are useful for when using a shared, public or borrowed computer, as the private mode stops history, cookies, passwords and other tracks being left on the computer.
On Internet Explorer 8 it is called InPrivate Browsing and is accessed on the Safety menu.
On Firefox 3.5 it is called Private Browsing and is accessed on the tools menu.
On Google Chrome 5 it is called InCognito and is accessed under the spanner icon.
On Opera 10.6 it is called a Private Browsing and is accessed under the Tabs and Windows menu.
The Private Browsing mode is also useful for those who like to access 2 or more webmail accounts at the same time.
26.8.10
Use YouSendit to send large files
You’ve probably seen it before. You send an email with a large attachment and an automated reply is returned by your corporate e-mail server saying that the message you sent exceeded the maximum size allowed for you. Or perhaps your message was sent but subsequently rejected by the receiving server because of a smaller message size threshold.
So how does it work? A sender logs into the web interface at YouSendIt.com and enters the recipient address or addresses. The sender navigates to the source file and uploads it to the YouSendIt.com servers. A custom URL is e-mailed to the recipient via YouSendIt.com. The recipient(s) then uses that URL to download the file from the YouSendIt.com servers.
There is a free level at which users can send files up to 100MB at a time. There are three subscription levels that add different functionality called Pro, Business Plus, and Corporate Suite.
23.8.10
How to find your computer's WPA key (Wi-Fi Security)
WPA stands for Wi-Fi protected access. It is a standard security protocol to secure wireless computer networks.
While connecting to your home network, you are often asked to insert a WPA key. This WPA key is either located in the modem or in the router you are using. In order to find your computer’s WPA key, follow the steps given below:
Step 1: First of all, you need to launch an internet browser. Press “Windows + R” keys to open the “Run” prompt and type “iexplore” without quotes to open Internet Explorer. You can also type “firefox” to open Mozilla Firefox. On the address bar at the top, type http://192.168.1.1 (Belkin routers use 192.168.2.1 as the default IP) and press “Enter” key.
This address belongs to your wireless modem or wireless router to which you are connected.
Step 2: A window asking for username and password will appear. In the username field, type “admin” without quotes and in the password field, either type “password” without quotes or leave the password field blank. Press “Enter” key to continue.
If password is correct, you will be redirected to the modem/router’s “Settings” page, otherwise, you will have to reset the modem/router. Check beneath the modem/router or check the manual for correct password.
To reset a Linksys modem/router or Belkin one, locate a small hole at the back of the modem/router and insert a pin to press the switch inside it. Keep the switch pressed for about 20-30 seconds after which the modem/router will restore the settings to “factory defaults” and reboot itself.
Repeat the step 2, in order to gain access to “Settings” page.
Step 3: On the modem/router’s “Settings” page, find “Wireless” option. Click the “Wireless” link to populate the wireless settings. Now, locate and click the “Security” or “Advanced Security” option.
On the security page, you will find “Network Authentication”. Different options available under the Network Authentication menu are open, shared, WEP, WPA, WPA2, WPA-PSK, WPA2-PSK, etc. Select either WPA or WPA2, to find your computer’s WPA key and insert this key when asked for.
If in step 2, you had reset the modem/router, you will not find any WPA or WPA2 key, and you will have to manually assign one. Select any of the WPA-PSK or any other authentication and assign a key to it. A key can be 8-63 long. For minimal security, you can choose 8 characters key, like “iN\/5R92”. For maximum security, choose 63 characters key like, “sJ0esmoU2cBD\m+oMp$nrXj5XPVRTvVA5fpwGSGI\RVz4RdQ7V3y\l$P1NrT9Be”.
After you have assigned a key, save/apply the changes and reboot the modem/router.
Note: The procedure shown above is common to most of the modems/routers. If this doesn’t apply to you, check your modem/router’s manual to find the wireless security option.
19.8.10
Smartphones - a simple guide
However, most true smartphones share several basic characteristics: wireless internet support, touchscreens, instant connection into your email account, sat-nav style navigation features and downloadable applications.
The most iconic smartphone is Apple’s iPhone. It first appeared in 2007 and several variations have since launched, the most recent being the iPhone 4.
All smartphones rely on an operating system (OS) to function, just like computers rely on Windows. Various smartphone OS exist already, but the most common are Apple’s iPhone OS, Android, Blackberry and Windows mobile, each with their own pros and cons.
Manufacturers periodically release OS updates that aim to fix any operating bugs and may also add extra features to your smartphone.
Smartphones can also access 3G mobile networks – a feature known as mobile web – to give you web access while, say, sat in a coffee shop or airport.
Applications tend to be referred to as apps. These downloadable programs let you add new features to your smartphone to keep the device up-to-date and interesting.
Apps are downloaded from virtual stores – the iPhone’s is called the App Store – accessed directly from your smartphone. Apps are available for almost anything, the most common app categories are: games, entertainment, social networking, music, travel, sports, news, finance, weather and books.
Apple’s iPhone App Store currently boasts over 185,000 different apps. The Android OS’ app store – known as the Android Market – has around 40,000 apps.
Some apps are free and others carry a charge. Prices range from 50p to well over £100, so be careful what you click on.
17.8.10
Focus Booster \ Break Timer \ Eye rest
Staying focused while working online (or offline) is a challenge. The distractions are too many. If you need something to increase focus while working then Focus Booster might help. It is a nifty timer that allows you to set work and break timings, and alerts you accordingly.
The tool is based on Francesco Cirillo's the Pomodoro technique, a time management method that advocates 25 minutes of work and 5 minutes break cycles for productive output.
This is excellent for your eyes too!
http://www.focusboosterapp.com/
The tool is based on Francesco Cirillo's the Pomodoro technique, a time management method that advocates 25 minutes of work and 5 minutes break cycles for productive output.
This is excellent for your eyes too!
http://www.focusboosterapp.com/
16.8.10
Outlook - Image attachment resize
In Outlook 2007 after you have attached your picture as a file (and not when inserted as an image in the body) you can press the little expand arrow in the right bottom corner of the Include section. This will show you the Attachment Options pane which allows you to resize the picture.

In Outlook 2010 this option can be found in under the File menu, once the image(s) are attached to the e-mail.
File - Info - option: Resize large images when I send this message.
In Outlook 2010 you can no longer choose between different sizes but the image will be resized proportionally so it won’t be larger than 1024×786 pixels.
12.8.10
Itunes - Add video to the TV Programmes library
Once you have your video files added to the Itunes Film library, select all the videos for the the series you are looking to pair together, for instance the six videos of The IT Crowd Season 2.
Right click and select 'Get Info', agree to update multiple videos at one time, under the Video tab put the program name and the season number as you see fit.
Next go to the Options tab, and go to the Media Kind drop down and select TV Programme.
That'll transfer the videos to TV Programmes and also pair them all up by whatever you put in the Video tab section.
11.8.10
Sync your iPhone to both your PC and your Mac
Prerequisites:
- 10 Minutes of your time
- On iPhone, iPod Touch, or iPod (Repeat for all devices you wish), select “Manually mange music and videos”
- Backup of iTunes Music
- iTunes closed
- Ability to find your iTunes folder: in Windows XP, its default location is in “My Music” and, for both Windows Vista and Mac OS, it is located in “Music”.
- Download HexEdit for Mac or UltraEdit for Windows for the secondary machine with which you wish to sync
- Knowledge of how to open a file with the editor downloaded in the point above on both Windows and Mac (however, you do not need to if using Mac to Mac).
On the Primary Computer (with which the iPhone, iPod Touch, or iPod was first synced):
- Make sure iTunes is CLOSED!
- Backup the iTunes Library on the machine with which you wish to sync. Backup “iTunes Music Library.xml” and “iTunes Music Library” (or iTunes Music Library.itl on Windows). It is important that you back these files up to a safe location because we will be modifying the files.
- Retrieve your iTunes Library ID. Open “iTunes Music Library.xml” with a text editor (TextEdit on Macs, Notepad on Windows). Find the entry after
On the Secondary Computer:
- Make sure iTunes is CLOSED!
- Retrieve your iTunes Library ID. Open “iTunes Music Library.xml” with a text editor (TextEdit on Macs, Notepad on Windows). Find the entry after
- Replace the the iTunes Library ID, in my case 0E958526D15C67FA with the one from the computer (8B6C633F7DACB74B-iTunes Library ID from the Windows machine) the iPhone is already syncing with. Save the file, then close it.
- In Hex Editor open “iTunes Music Library” (iTunes Music Library.itl on PC)
- Choose “Find and Replace” from the Edit menu. Make sure the “Hex” matching is selected not ASCII. Find the iTunes Library IDs you found from both the primary and secondary computers.
- In the “Find” section, enter the iTunes Library ID of the secondary computer and, in the “Replace” section, enter the iTunes Library ID from the primary computer. There should be one match. Save the file and close.
You should now be able to sync your devices with two or more computers. Now, you will not be alerted by the annoying “Erase Your Data” prompt from iTunes.
10.8.10
You might need to reboot your router to see a website
If a website you visit regularly no longer loads then rebooting your router can solve the problem. This forces the router to flush it's cache and find the website at it's current address and not from an address it's remembered using previously.
9.8.10
Windows 7 - printing to a shared printer on an XP PC
Assume the computers are call XPMACHINE and W7MACHINE.
1) Ensure Printer on XP machine is shared - assume it's called SHAREDPRINTER.
2) On the Network Browsing on your Windows 7 machine ensure you can "See" the Printer share.
Now on the Windows 7 machine do the following (doesn't matter if it's x86 or x64).
3) Control Panel==> add LOCAL (Yes LOCAL) printer. I know it's on a Network but hold your horses -- what we are actually doing is fooling the Windows 7 machine into thinking it's running the printer.
4) Create NEW port==>Local port
5) Portname is \\XPMACHINE\SHAREDPRINTER
6) Now Windows 7 will load a driver and you'll be able to print on the XP machine
7.8.10
Rename Multiple Files at Once
Once all the files you want to rename are highlighted, press F2, or right-click on one of the files and select Rename. All of your file selections will disappear except for one, but don't panic: Type in your new name and click Enter. That's it! One file will be now be named "renametext" and the others will have sequential numbers in the format of "renametext (1)" and "renametext (2)" and so on


6.8.10
Gmail - Save Attachments to the Desktop via Drag-and-Drop
Saving dozens of e-mail file attachments to your computer just became a whole lot easier.
Google has added a new feature to Gmail: the ability to save file attachments by simply dragging-and-dropping them onto the desktop. If you hover over the file icon or the “Download” link for any attachment, you’ll notice the new text prompting you to drag the file to your desktop to save.
It’s really as simple as it sounds. There is one caveat to saving file attachments via drag-and-drop, though: The feature is only available in Google Chrome.
Google has been adding more drag-and-drop functionality to Gmail in recent months. Back in April, Google launched the ability to add attachments to e-mails via drag-and-drop. In May, Google gave Gmail users the ability to add images to e-mails via drag-an-drop.
1.8.10
Outlook Sorting contacts and messages by multiple criteria
It’s a trivial task to sort your Outlook contacts: simply display them in List view and click any of the column headers. So, to sort by category, click the Category column header; to sort by name, click the Full Name column header.
It’s an equally trivial task to sort your contacts by multiple criteria. Trivial, but not obvious.
You perform the first sort as usual, by clicking the column header; you then perform the second sort by holding down the Shift key while clicking another column header.
For example, to sort your contacts by category and then by name first click the Category column header and then hold down the Shift key and click the Full Name column header.
You can sort by up to four columns using this shift-click method. You can also use the same technique to sort your email messages.
Finding phone-less, email-less contacts
I sometimes find it useful to sift out any contacts in my list who have no phone number and no email address. To do that, I click Business Phone, then shift-click Home Phone, shift-click Mobile Phone and shift-click E-mail. This lets me see at a glance any contacts who have no information in any of these fields.
Note that you may need to double-check fields such as E-mail 2, Business Phone 2, Assistant’s Phone and so on if you’re checking to see whether you have no phone or email info whatsoever for a particular person. You can do that either by double-clicking the contact and checking out their details or by adding those columns to the List view and sorting on those fields. To add a column to the List view:
[Note: These instructions are for Outlook 2010. The process is similar for Outlook 2007 and 2003.]
Combining sorting and categories
Because of the 4-column limit on sorting, if I need to sort by additional columns, I’ll usually sort by the first four and then categorise all the matching contacts. I can then do a simple sort on the category column and use the shift-click method to add deeper levels of sorting.
For example, say I want to find all those contacts who have no e-mail, e-mail 2 or e-mail 3 address and no business phone, mobile phone or home phone listed. I can do this 6-level sort in this way:
It’s an equally trivial task to sort your contacts by multiple criteria. Trivial, but not obvious.
You perform the first sort as usual, by clicking the column header; you then perform the second sort by holding down the Shift key while clicking another column header.
For example, to sort your contacts by category and then by name first click the Category column header and then hold down the Shift key and click the Full Name column header.
You can sort by up to four columns using this shift-click method. You can also use the same technique to sort your email messages.
Finding phone-less, email-less contacts
I sometimes find it useful to sift out any contacts in my list who have no phone number and no email address. To do that, I click Business Phone, then shift-click Home Phone, shift-click Mobile Phone and shift-click E-mail. This lets me see at a glance any contacts who have no information in any of these fields.
Note that you may need to double-check fields such as E-mail 2, Business Phone 2, Assistant’s Phone and so on if you’re checking to see whether you have no phone or email info whatsoever for a particular person. You can do that either by double-clicking the contact and checking out their details or by adding those columns to the List view and sorting on those fields. To add a column to the List view:

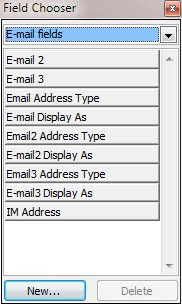
- Right-click any of the column headers and select Field Chooser from the context menu.
- In the Field Chooser, use the drop-down menu at the top to select the type of fields you want to add – E-mail Fields, Phone Fields and so on.
- Select the specific field you want to add and click-and-drag it alongside any of the existing columns in your contacts list.
- Repeat the process for additional fields, then close the field chooser.
- To delete a column for the contacts list, right-click the column header and choose Remove This Column from the context menu.
[Note: These instructions are for Outlook 2010. The process is similar for Outlook 2007 and 2003.]
Combining sorting and categories
Because of the 4-column limit on sorting, if I need to sort by additional columns, I’ll usually sort by the first four and then categorise all the matching contacts. I can then do a simple sort on the category column and use the shift-click method to add deeper levels of sorting.
For example, say I want to find all those contacts who have no e-mail, e-mail 2 or e-mail 3 address and no business phone, mobile phone or home phone listed. I can do this 6-level sort in this way:
- Click the E-mail header to sort by that column.
- Shift-click E-mail 2 and E-mail 3.
- Select all the matching contacts (click the first matching contact, scroll to the last matching contact and shift-click it).
- Right-click in the Category column and select All Categories from the context menu.
- Click the New button to create a new category called No Email, then click OK twice to close the dialog boxes and apply the category to the selected records. (In fact, I have a special ‘Temp’ category set up that I use for this sort of on-the-fly categorising: I apply it whenever I need it, then remove it once I’ve finished the task at hand.)
- Now, click the Category column header to perform a new sort based on that column alone.
- Shift-click Business Phone, Mobile Phone and Home Phone to apply the deeper sort levels.
29.7.10
Picasa - A quick Guide
Library View
This is the default view when Picasa starts. Any time you’re dealing with more than one image, or browsing to find one to work with, you’re spending your time here. Let’s break this down.
 |
Menus and toolbars
At the top of the screen is the normal collection of menus and toolbars, and most of these do just the things you might expect them to. We’ll deal with these as they come up. Note where the help menu is though. It’s very useful, but has an annoying peculiarity that’s becoming rather common. None of the help info is stored locally, so it will only work while you are online.
Folder list
 |
On the left of the Library View is the Folder List. There are two ways to view this. The default, shown here, is called Flat, because it just lists all the folders without any indenting. There are, when you start, two Collections in the list. Albums and Folders. Folders are grouped by year. It’s only by chance that my folder names are also dates, and confuse the issue. The Folders listed directly relate to the folders/directories you see in Windows Explorer. Albums are virtual collections of files, and don’t relate to anything real on your hard drive. You can create an album and add images, and all Picasa does is keep track of them together, without actually moving any of the real files. |
 |
You switch between the Flat and Tree view using the view tool in the toolbar or the Folder View option in the View menu. The Tree view shows the folders nested, the way Windows normally does. The Flat View can be annoying until you get used to it, and then switch camps, so give the Flat View a try first. Whichever view you use, they operate much the same way. |
Light box
 |
The major portion of the screen, and the one you’re likely to spend most of your time, is called the Light Box, after the boxes traditionally used by photographers to view and compare slides.
The light box is similar to the thumbnail view in Windows Explorer, and mostly behaves the same way, except for one very strange but handy feature. If you scroll out the top or bottom of the view of the older you are in, it just happily continues to the next or previous folder (or album).
Once you actually click on an image, the Folder List highlights the current folder again.
Status Bar
Directly underneath the Light Box is the status bar. This shows you a whole lot of information about whatever is currently selected. Keep an eye on it. It’s very handy.
Underneath the Status Bar are two more important features, collectively known as the Photo Tray.
Photo Tray
 |
On the right are all the tools you need to deal with moving your images onto the web, printing them, blogging etc.
Top right of this tool is a slider to let you change the thumbnail size in the Light Box. To the left are some buttons for dealing with individual images, including rotating and favouriting (alright, favoriting) them.
 |
Over in the left corner is the Photo Tray itself. This tool lets you deal with multiple files at once. We won’t be doing that here, but those three buttons are (from top to bottom) Hold, Clear and Add to Album. Okay, now you know your way around, you can take a look at an individual file. Just double-click on one in the Light Tray. |
Edit View
 |
That’s it. Click the Back to Library button, top left, or hit the Escape key to return to the Library view.
16.7.10
How to Seed Moved or Renamed Files in BitTorrent
This feature is available in uTorrent version 1.8 and later. You can not change file names and keep seeding with earlier versions of uTorrent.
You can use this guide if you move or rename the folder in addition to changing file names.
It is possible to change file (and folder) names because they are not really parts of the files. They are like ''labels'' that tell the computer where to find the content of the files.
After such changes, you need to retarget the files in uTorrent if you want to keep seeding the torrent. The procedure for doing this is the same no matter if the torrent is already loaded in uTorrent, or if you add it as a new torrent.
Seed Renamed Files
1. If the torrent is already loaded in uTorrent, right-click it and choose ''Stop'' (if it is not already stopped). If you are adding a new torrent with changed file names, make sure that you add it in stopped mode (or stop it very quickly if you fail to do this).
2. Select the torrent, then click the ''Files'' tab in the lower pane. (If you have no lower pane, click ''Options'' and check ''Show detailed info''.)
3. Right-click a file and choose ''Relocate...'' from the menu. (If you have also changed the folder name, or moved the folder, you need to browse to the right folder.)
4. When you are in the right folder, simply click the new file name for the file, then click ''Save''. Be careful that you really choose the right file: sometimes uTorrent and Explorer show the files in different order.
You will see the changed file name in the file list in uTorrent.
5. Optional: When you have changed all the file names to the new names, you may want to right-click the torrent and choose ''Force re-check'' in order to be sure that all the files were pointed to the right new names.
6. Right-click the torrent and choose ''Start'' (or ''Force Start'' if you want to make sure the torrent does not get queued).
Seed Files Inside a Renamed or Moved Folder
1. Stop the torrent by right-clicking it and choosing ''Stop''.
2. In uTorrent, right-click the torrent and choose ''Advanced - Set Download Location...''
3. Browse to the moved and/or re-named folder, click OK.
4. Optional: If you have re-named the folder and want to change the name of the torrent, so that the new name shows in uTorrent, too, select the torrent and (left-)click it again. (or select the torrent and press F2)
5. Optional: If you want to be really sure you got it right, right-click the torrent and choose ''Force Re-Check''. When it stops checking, uTorrent should say that 100% is done.
6. Right-click the torrent and choose ''Start'' (or ''Force Start'' if you want to make sure the torrent does not get queued).
26.6.10
Outlook - Force GAL update for new profile or host
Delete *.oab files from PC, then under Send/Receive Menu choose to download address book
How to move Outlook 2007 .ost file to another drive
If you want to move Outlook 2007 .ost file to another drive you need to Change the location where your offline files are saved.
1. First you need to close your Outlook.
2. Click Start, and then click Control Panel.
3. Double-click Mail, and then click E-mail Accounts.
4. Click View or change existing e-mail accounts, and then click Next.
5. Select the Microsoft Exchange Server account, and then click Change.
6. Clear the Use Cached Exchange Mode check box.
7. Click More Settings.
8. Click the Advanced tab.
9. Click Offline Folder File Settings.
10. Click Disable Offline Use, and then click Yes in the dialog box that appears.
11. Click Offline Folder File Settings.
12. Click Browse, go to the location where you want to save your .ost file, and then click Open.
13. Click OK.
14. Select the Use Cached Exchange Mode check box.
15. Click Next, and then click Finish.
Subscribe to:
Posts (Atom)