27.10.20

Office 365 - Microsoft has enabled Security Defaults to keep your account secure

 Have you recently created a new Microsoft 365 or Office 365 account and users are being forced to setup MFA within 14 days despite MFA not being configured?

Here is how to temporally disable the new security default policies to turn off this behaviour.

Log into your tenant and go to the Admin console https://admin.microsoft.com and click in ‘Azure Active Directory’ from the left hand menu.

now click on ‘Azure Active Directory’ then ‘Properties’ then ‘Manage Security Defaults’.

Set ‘Enable Security Defaults’ to ‘No’.

Tick an option which most applies to you and click ‘Save’.

Now users will not be forced to configure MFA but remember weak passwords are causing us all major issues so please enable MFA for user accounts as soon as you can.

29.3.20

Windows Real-time battery discharging monitoring

To track battery discharging in your current power configuration we are able to know about:
  • How much power is used in the whole system in real-time?
  • What activities that will use much power to process.
  • Compare power usage when you customize your system configuration.
BatteryBar has all features that we need to monitor battery discharging in real-time. Below is all the basic real-time battery information that available:
Real-Time Battery Discharging Monitoring

As you can see my current
 Discharge Rate is 3,539 mW or 3.5W and with 82.9% of battery capacity, so it means that with current system configuration and activities my battery life still remains 6 hours and 16 minutes.
Click here to download BatteryBar For Windows
Now you got the idea, to get more battery life you will need to minimize discharge rate as possible.

22.3.20

Share Exchange Outlook Calendar On IOS Devices


1. Log into outlook web app - In the top right click Calendar. Right Click the shared calendar and click Share Calendar.
Enter the email address you want to share it to and click Send. This sends an email to the user in question to accept the shared calendar invitation.
THIS IS THE IMPORTANT PART
2. The user now needs to open this email on their iOS device. Within the invitation email there is a link at the bottom under “To subscribe to this calendar using an Internet calendar-compatible program, such as Microsoft Outlook 2007 or a later version, copy and paste the following Web address into your Web browser:”
3. Tap the link on the iOS device ending in .ics and you will receive a notification on the phone asking if they want to “Subscribe to the calendar “shared calendar name”?” Tap Subscribe and now you will see the shared calendar under the Calendar app on the iOS device.

Follow these step to remove subscribed calendars:
Open ‘Settings’ on your iPhone or iPad and tap on ‘Mail, Contacts, Calendars’. …Scroll to ‘Accounts’ and look for ‘Subscribed Calendars’ and tap on it. …
If you have more than one subscribed calendar, then select the one you want to remove and then, tap on ‘Delete Account’.

8.3.20

Look up words in the thesaurus - Word & Outlook

  1. Click the word in your document that you want to look up.
  2. On the Review tab, click Thesaurus.
    Thesaurus command on Review tab
  3. To use one of the words in the list of results or to search for more words, do one of the following:
    • To replace your selected word with one of the words from the list, point to it, click the down arrow, then click Insert.
    • To copy and paste a word from the list, point to it, click the down arrow, then click Copy. You can then paste the word anywhere that you like.
    • To look up additional related words, click a word in the list of results.

17.2.20

Block distracting websites and apps

https://freedom.to

If you need to focus on your work, break a habit, or simply improve your relationship with technology, Freedom can help. By blocking distracting websites and apps, you’ll be more focused and productive.

9.2.20

How to Import or Export an Outlook Signature


Exporting Outlook Signature Files

Step 1
Close Outlook if the program is currently running.
Step 2
Click the "Start" button, type “%APPDATA%\Microsoft\Signatures” (without quotes here and throughout) in the search box and press “Enter.” You should see three files for each of your signatures: an HTML file, a TXT file and an RTF file.
Step 3
Press “Ctrl-A” to select all of these files, and then press “Ctrl-C” to copy them to the clipboard.
Step 4
Click "Start," select “Computer” and browse to a location where you’d like to store your exported signature files. You may create a dedicated subfolder for the files for simplicity's sake. To create a subfolder, right-click in an empty space, hover your mouse cursor over “New” and click “Folder.”
Step 5
Double-click the new folder and press “Ctrl-V” to paste the files. If you intend to export the signature to an Outlook installation on another computer, it’s best to back up to a flash drive, external hard drive or a network share.

Importing Outlook Signature Files

Step 1
Set up your email account in the new Outlook installation if you haven’t already done so. You cannot import your signature until after you've created your profile.
Step 2
Close Outlook.
Step 3
Browse to the folder in which you saved your signature files. Press “Ctrl-A” to select them and press “Ctrl-C” to copy.
Step 4
Click "Start," type “%APPDATA%\Microsoft\Signatures” and press “Enter.”
Step 5
Press “Ctrl-V” to paste the files. The next time you open Outlook, your signature(s) will be available


26.1.20

Fix Blurry Windows 10 Fonts

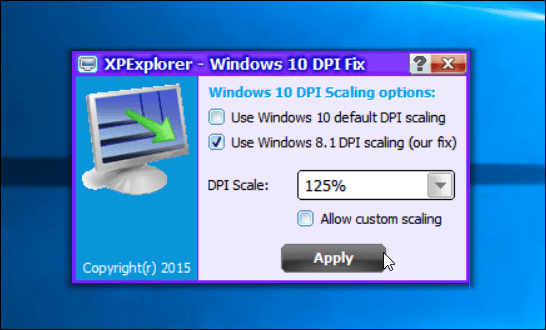
Here is a handy utility you can use to correct the problem  called XPExplorer – Windows 10 DPI Fix, and it’s free.
Start it up and check the Use Windows 8.1 DPI Scaling  option and then choose your scaling level.
set to 125
A restart is required to complete the installation. When you get back fonts in the apps you were having issues with, they should no longer be fuzzy, but clean and clear again.
This utility is nice to have because it will work across the board and you won’t need to use the manual method for fixing everything that has fuzzy/blurry text.