24.9.25

Improve Windows 11 with registry hacks part 3


8. Add seconds to system clock

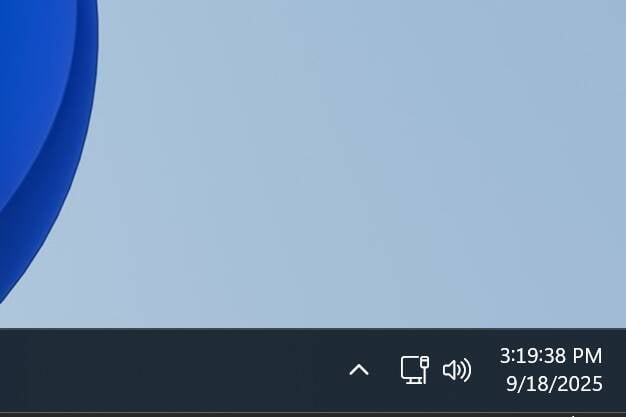
If you like to know exactly what time it is - right down to the second - you can set the system clock to show seconds in addition to hours and minutes.

Seconds in system clock

Seconds in system clock - Click to enlarge

To add seconds to your system clock, navigate to HKEY_CURRENT_USER\Software\Microsoft\Windows\CurrentVersion\Explorer\Advanced in Regedit. Then create a DWORD (32-bit) value called ShowSecondsInSystemClock and set that value to 1. You can set it to 0 later if you get sick of seeing the seconds tick away while you’re trying to work.

Set ShowSecondsInSystemClock to 1

Set ShowSecondsInSystemClock to 1 - Click to enlarge

Close Regedit and restart. Now, the next time you're watching the clock at the end of the day, you'll know whether you have 50 seconds or 25 seconds until 5 pm.

9. Add your favorite program to the right-click menu

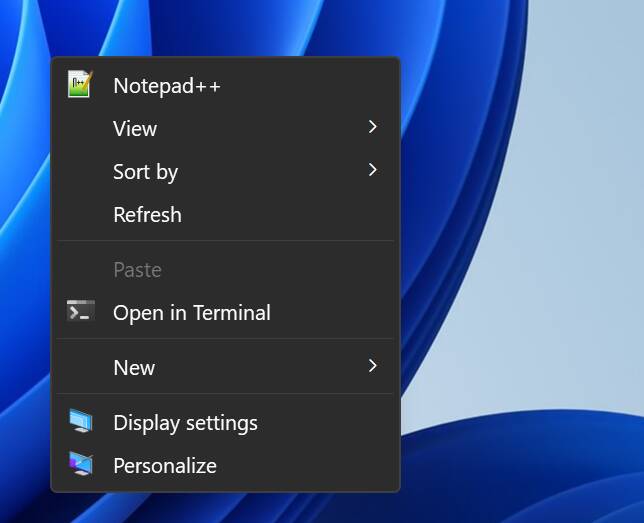
If you have a program that you use a lot, you can add it to the context menu that appears when you right click on the desktop. To make the most of this, we assume that you’ve already enabled the full context menu as shown above in the first hack.

First, take note of the path to the executable for the program you want to create a shortcut for. In my case, I’m going to use Notepad++, which installs to C:\Program Files\Notepad++\notepad++.exe.

Then open Regedit and navigate to HKEY_CLASSES_ROOT\Directory\Background\shell. Create a key under the shell folder with the name of the app (in my case, "Notepad++"). Enter that folder.

Create a Registry key under HKEY_CLASSES_ROOT\Directory\Background\shell

Create a Registry key under HKEY_CLASSES_ROOT\Directory\Background\shell - Click to enlarge

Create a string value in the folder and name it Icon with a capital I. Enter the full file path to your executable as the value with quotes around it.

Set the string value Icon to the path to your program

Set the string value Icon to the path to your program - Click to enlarge

Create another Registry key (aka folder) underneath this one (e.g., Notepad++) and name it Command with a capital C. Open the (Default) value in this folder and set it to the executable file path (again with quotes around it).

Create a subkey called Command and set its default value to the application path

Create a subkey called Command and set its default value to the application path - Click to enlarge

Close Regedit and reboot. The new app is now on your classic context menu.

Your program is now on the (classic) context menu

Your program is now on the (classic) context menu - Click to enlarge

If you want your icon to appear at the top of the list (above View), create a string value named Position in the same folder as the Icon value and give it a value of Top. Then your icon will be above all others.

Program icon on top of the context menu

Program icon on top of the context menu - Click to enlarge

10. Click once on taskbar to get last active window

It happens all the time. You have multiple windows from the same application open – most often from a browser – and to get to a particular one, you need to hover over the taskbar icon and then choose the thumbnail you want.

Hovering over a taskbar icon shows its different windows

Hovering over a taskbar icon shows its different windows - Click to enlarge

But, with a simple Registry tweak, you can fix Windows 11 so that clicking on the program's taskbar icon immediately takes you to the most recently active window from that application. If the browser window with theregister.com was the last one you were looking at, then clicking the browser's icon should make that the active window.

To enable this feature, navigate to HKEY_CURRENT_USER\Software\Microsoft\Windows\CurrentVersion\Explorer\Advanced in the Registry. Then create a DWORD (32-bit) value there called LastActiveClick. Finally, set that value to 1.

Set LastActiveClick to 1

Set LastActiveClick to 1 - Click to enlarge

When you reboot your computer, clicking a taskbar icon will take you to the last window you were using from that app.

11. Have startup apps launch more quickly

If you have apps that you’ve set to start when Windows starts, you will notice that it may take a while after the desktop appears before they start opening. In fact, on a Windows install I just tested, it took around a minute after the desktop had loaded before my startup apps appeared.

However, with a simple Registry tweak, you can tell Windows to start opening apps right away. Granted, if your computer is slow, you may want to leave the default delay in place to give your PC time to reach a comfortable idle state before it starts launching programs. But if you have a reasonably modern computer, you’ll benefit a lot from making this change.

To get rid of the startup delay, first navigate to HKEY_CURRENT_USER\Software\Microsoft\Windows\CurrentVersion\Explorer in Regedit. Then create a new key underneath that one and call it Serialize.

In Serialize, create two DWORD (32-bit) values: StartupDelayInMSec and WaitForIdleState. Set both of those to 0.

Improve Windows 11 with registry hacks part 2


4. Disable the pointless lock screen

Microsoft's click-wasting lock screen was clearly created with the corrupt influence of big orthopedics, as it's designed to induce more expensive cases of carpal tunnel syndrome. By default, each time you boot or wake up your PC, you're presented with a screen that shows the time and, if you haven't turned them off, promotional messages that encourage you to do things like play Candy Crush.

You then have to click before being asked to enter your password or PIN. Why bother? Using the Registry, you can disable the lock screen and have the password box be the first thing you see.

In Regedit, navigate to HKEY_LOCAL_MACHINE\SOFTWARE\Policies\Microsoft\Windows and then create a key called Personalization under it (if it doesn't already exist). In the Personalization key, add a DWORD (32-bit) value called NoLockScreen and set its value to 1.


5. Get rid of the Settings home screen

Windows Settings used to drop you directly into the System tab, where there are important sub-menus for Display, Sound, Notifications, Power, and more. However, in recent builds, it takes you to this showy and unnecessary home screen and then makes you navigate from there.

If you want clicking on Settings to take you directly to the system tab, you can modify the Registry to make it so.

In Regedit, navigate to HKEY_LOCAL_MACHINE\SOFTWARE\Microsoft\Windows\CurrentVersion\Policies\Explorer. Then create a string value called SettingsPageVisibility. Open that value and set it to hide:home.

Once you’ve rebooted your computer, opening Settings will take you straight to the System tab.

6. Turn on verbose mode

When you go to start, shut down, or restart Windows, you don’t get a ton of detail showing you what’s going on. However, there’s a Registry tweak called verbose mode that shows you exactly what your PC is doing during these processes.

This can be useful, because if your computer stalls while it’s doing something like opening the local session manager or shutting down the Update Orchestrator service, then you know what to fix. It’s also just a lot more fun to watch.

To enable Verbose Mode, start by navigating to HKEY_LOCAL_MACHINE\SOFTWARE\Microsoft\Windows\CurrentVersion\Policies\System in Regedit. Then create a DWORD (32-bit) value called verbosestatus. Open that DWORD and set it to 1.

7. Set menu delay to 0

By default, Windows 11 waits 400 milliseconds to show expanded menus like the ones you get when you right click and select the New menu (in new or classic context menu). But why wait? That's 400 milliseconds you'll never have again!

You can use a registry setting to lower this delay to 0 milliseconds and have the flyout menus appear any time you scroll past an expandable menu item.

To change your menu delay, open Regedit and navigate to HKEY_CURRENT_USER\Control Panel\Desktop. Then open MenuShowDelay and set it to 0. If you want some delay, you can set it to 100, 200, or 300 milliseconds.


Windows 11 Registry hacks


1. Bring back the full right click context menu

By default, Windows 11 hides all of the available options from its right-click menus. If you want to see each one of them, you need to click "Show more options." Some options, such as "Print" and "Create shortcut," are always missing, and links to open a file in a particular program are at the bottom rather than the top of the list of options.

Below, you can see the default context menu you get when right-clicking an image file on the left versus the Windows 10-style complete context menu on the right. The options will vary based on what you right click on and what you have installed, but you always get a more complete list with the full context menu.

Windows 11 context menu (left) vs full classic menu (right)

Windows 11 context menu (left) vs full classic menu (right) - Click to enlarge

To switch to full context menus, first open Regedit and navigate to HKEY_CURRENT_USER\Software\Classes\CLSID.

Registry key - HKEY_CURRENT_USER\Software\Classes\CLSID

Registry key - HKEY_CURRENT_USER\Software\Classes\CLSID - Click to enlarge

Then create a new Registry key (aka a folder) called {86ca1aa0-34aa-4e8b-a509-50c905bae2a2} underneath CLSID. You do that by right clicking on CLSID and selecting New->Key. Then you rename the folder it creates to {86ca1aa0-34aa-4e8b-a509-50c905bae2a2}.

Create registry key

Create registry key - Click to enlarge

Create another new key under {86ca1aa0-34aa-4e8b-a509-50c905bae2a2} and call it InprocServer32. Then open the default value in InprocServer32, set it to blank, and click Ok.

Create new key called InprocServer32

Create a new key called InprocServer32 - Click to enlarge

As always with Registry changes, you’ll need to close the Registry and then restart your computer (or log in / log out) to see the changes.

2. Shut down even when apps don't want you to

We’ve all been there. You go to shut down or restart your computer and you get an error message like the one below. One or more of your apps claim to have unsaved content and therefore it won’t close and won’t allow Windows to power down.

Shutdown delay

Shutdown delay - Click to enlarge

Sometimes the apps that prevent a shutdown don’t even have unsaved content in them. In the example above, File Explorer itself was among those holding up the train. Or perhaps you didn’t really want to save that image you already copied and pasted out of Photoshop and onto Facebook, but the image editor is still blocking shutdown.

Fortunately, with a simple Registry change, you can tell Windows to force-close apps that prevent it from shutting down.

First, in Registry Editor, navigate to HKEY_CURRENT_USER\Control Panel\Desktop.

Navigate to HKEY_CURRENT_USER\Control Panel\Desktop

Navigate to HKEY_CURRENT_USER\Control Panel\Desktop - Click to enlarge

Then create a string value called AutoEndTasks if one with that name doesn’t already exist. You can create a string value by right clicking in the right pane and selecting New->String Value. Then rename it to AutoEndTasks.

Create a new String value called AutoEndTasks

Create a new String value called AutoEndTasks - Click to enlarge

Then set AutoEndTasks to 1. You do that by double clicking on AutoEndTasks and entering 1 in the dialog box that appears.

Set AutoEndTasks to 1

Set AutoEndTasks to 1 - Click to enlarge

Add another string value called WaitToKillAppTimeout (if it doesn’t exist) and set it to 2000. This controls how many milliseconds Windows waits before killing an open app. Then add HungAppTimeout and set it to 2000.

Navigate to HKEY_LOCAL_MACHINE\SYSTEM\CurrentControlSet\Control and set the WaitToKillServiceTimeout string value to 2000. Finally, close Regedit and reboot.

3. Hide web results from Windows Search

Windows 11’s built-in search box is more useful than its Start menu. Often, when I want to launch an app such as Photoshop, I'll just start typing the first few letters of the name into the box and my desired shortcut will pop up almost immediately.

Unfortunately, by default, Windows search also queries Bing for web results. For example, when I asked it to find "cats," it showed me a bunch of search results about the animals above, where it showed me a JPG file on my computer named cats.jpg. It also made me wait a few seconds so it could download that information from the web.

Bing results in Windows Search

Bing results in Windows Search - Click to enlarge

You can stop Microsoft from pinging the internet when you just want to find what's on your computer. To do so, open Regedit and navigate to HKEY_CURRENT_USER\Software\Policies\Microsoft\Windows. Then create a new key underneath that folder called Explorer and navigate to it.

Create a new Registry key called Explorer

Create a new Registry key called Explorer - Click to enlarge

Within Explorer, create a DWORD (32-bit) value by right clicking and selecting New->DWORD (32-bit) Value.

Create a new DWORD (32-bit) value

Create a new DWORD (32-bit) value - Click to enlarge

Rename the value to DisableSearchBoxSuggestions and set it to 1.

Rename the value to DisableSearchBoxSuggestions and set it to 1.

Rename the value to DisableSearchBoxSuggestions and set it to 1. - Click to enlarge

Close Regedit, restart Windows, and you’ll no longer be seeing Bing slop mixed in with files and apps from your own C drive.